Thursday, March 22, 2012
Wednesday, February 4, 2009
Pressing Problems


Crispy commented on this sunflower, which was shown in my first post. She also asked how I planned to press the seam allowances on those sharp points at the tips of my current block, the compass, so that the seams went under the yellow patches, as I said I was going to (sharp gal!) Interestingly, I can illustrate this little problem with the compass by showing how I handled the same issue in the sunflower block.
The second photo above shows the back of the sunflower block. (Brown thread! I would have used white on the outer petals if I were doing it now.) Notice the tips of the petals. I have pressed the seam allowances under the petal patches. I did this so the petals would appear to stand out, especially if I planned to quilt around their edges "in the ditch". Also, the background fabric is rather thin, so the seam allowances would have shown somewhat if I had pressed any of them them toward the background instead. So in this case I elected to press the seam allowances toward the petals, even though right at the tip it gets a bit bulky. Can you see that?
I accomplished this by pressing the seam allowance under on one side of the petal, and then, when I folded the other side under, the bulk at the tip is folded back on itself. This fabric is thin, as I said, so it really isn't much of a problem. I don't plan to quilt through that bulk (I could trim it a bit at the very tip if it was going to prevent me from quilting close to the petals there), and it lies flat enough.
But what if the fabric had been bulkier? Like the fabric I used in my compass. And what if those petals were long and skinny, like the sharp points of the compass? Then I might make another decision. You can see from the next photo, of the back of my compass, that the seam allowances are quite cooperative except at the outer edge of the block. There, they stand straight up! (By the way, this block section has not been pressed with an iron yet. Only finger-pressed. I do not want to distort the fabric, and I also like to see the natural behavior of the seams. Forcing them to go in a contrary direction is a last resort.)

(Click on the photo to see it larger. Then use your browser's Back button to return to the blog.)
What are my choices here? I chose these bulky fabrics because they were the best I had on hand for this project. The background is Kona Natural (this is not like the stiff Kona solids, which I do not like to hand piece with), and it is bulky and soft, like a thick muslin. The yellow is also a "beefy" fabric. I selected these two fabrics because I liked the yellow, and the Natural was the only thing I had on hand that would work well with it. I knew the seam allowances might give me some trouble, but I had the confidence that I would be able to find a way to handle them when the time came. As I piece the block, I consider the options.
The options I can think of are: 1) Press the seam allowances away from the yellow instead; 2) Press the seam allowances all in the same direction; 3) Press the seam allowances toward the yellow, folding them as I did in the sunflower block; 4) Plan to use a batting with a bit of loft and simply let the seam allowances sink down into it, going in whichever direction they like, then use a quilting pattern that would avoid them; 5) Clip the allowances somewhere so part could go out and part in (if you follow); and 6) ???
Have I missed any options? One thing I know for sure, I will find a good way to do it. The point is, every block is different not only in its design but also in the qualities of the fabric, the quilting pattern you plan to use, the batting you plan to use, and other ways. I just want to point out that I don't have all the answers when I begin. I consider what I can, and anticipate what problems I can in order to make the whole experience pleasant, but I can't figure it all out ahead of time. However, I can apply my experience with past projects to the new block whenever I get to a point of decision. Having considered the same issues in the past helps me make the best choices for the current block.
I am sharing this with you now to help you make these decisions, too. I want to point out (though I know many of you know this well already) that it is never "one size fits all", that these picky things are worth considering, that there are a lot of considerations as well as a lot of options, and that past experience helps with decision making. I am only interested in piecing fun blocks! The piecing experience must be enjoyable. I suppose I work rather hard to make it so, but I enjoy that process, too :-)
Tuesday, February 3, 2009
Monday, February 2, 2009
Piecing the Unit

I only marked sewing lines on the yellow pieces, which save a lot of marking. I could do this because I can sew every seam with a yellow patch on top. I follow the sewing lines on the yellow patch. As long as the two patches are aligned at the cut edge, the seam will be where it should be on the back patch.
Note: I am left handed, so all my photos are from that perspective. I sew from left to right rather than from right to left as a right-hander would.

The first seam joins the small white triangle to the yellow piece. You can hardly see it behind the yellow in this photo. I didn't have to pin this short seam.
I always sew just outside the line to compensates for the bit of fabric taken up as the patches bend at the seam line. This is most important with "beefy" fabrics such as the ones I'm using in this project.

I have finger-pressed the first white patch out of the way and placed the first of the two long white patches beneath the yellow one. The thread is not cut but continues from the previous seam. I had already taken one stitch when this photo was taken. The needle is reinserted at the same place for a backstitch. This is how I begin all my seams. Next I pinned the other end of the pair. Then I placed a couple of pins along the length.

The second long white patch is aligned...
And here is the finished unit. I have finger-pressed the long seams toward the yellow patch.
The Piecing Order
Click on the illustration to enlarge it. Save it, if you like. Click your browser's Back button to return to this blog. (Note: Some lines appear to be curved. This is only a result of my inexperience with file conversion. All the lines are straight.)

This block is surprisingly simple and kind of fun. You make a little unit, then another, then you get to join these together with two single patches to make a larger unit. You make two of those, then you get to join them together into a bigger unit. You make two of those... and before you know it, you have a quarter of the compass done. I finished my first quarter today, and also the central star. It has taken the spare moments of the past three days to get that much done, and I enjoyed it all. Not bad! Tomorrow I'll post some photos of the sewing in progress.

This block is surprisingly simple and kind of fun. You make a little unit, then another, then you get to join these together with two single patches to make a larger unit. You make two of those, then you get to join them together into a bigger unit. You make two of those... and before you know it, you have a quarter of the compass done. I finished my first quarter today, and also the central star. It has taken the spare moments of the past three days to get that much done, and I enjoyed it all. Not bad! Tomorrow I'll post some photos of the sewing in progress.
Templates and Marking the Patches

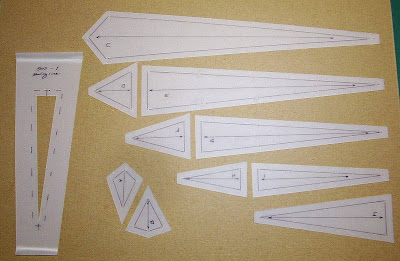
Here are the plastic templates I made from the EQ template printout. (You can click on the photo to enlarge it. Then use the browser's Back button to return here.) I just traced over the pattern then cut out the templates using a pointed Xacto knife and metal ruler. I punched holes with a 1/16" hole punch where I want to mark dots on my fabric for matching up the ends of seams. This is template plastic, sold at quilt shops for this purpose. I love the stuff.
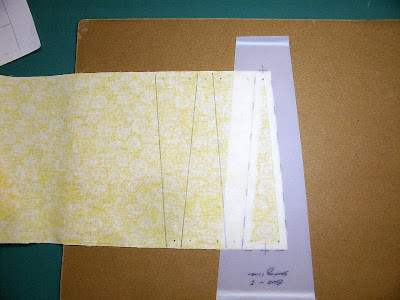
I like to sew along a drawn line, so I usually mark my patches a quarter-inch in from the cut edge. When I have many templates to mark, I make a window template like the one to the left in the photo. I had traced the sewing line on this template and then cut out the inside portion AND the line. I tested it to make sure my pencil mark when I trace the sewing line will be exactly where it should be. It is tricky getting this window just right, but when there are many patches to mark, it is a real timesaver.
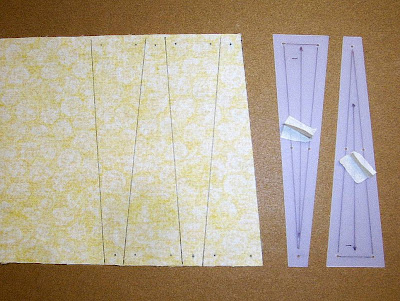
The next photo illustrates my method for cutting triangle patches. It is quick! First I cut a strip that is the width of the template's length. This strip is cut cross-grain so the patches will end up with the lengthwise fabric grain aligned with the arrow on the template (to keep those long, skinny pieces from stretching out of shape.) If I have many patches to cut, I'll make two identical templates, as you see below, so I can leapfrog them across the fabric. Here's how that works: After I trace around the first template, I butt the second one up against it, rule along it with my pencil, then hold THAT one in place and move the first one to the next position, etc. Using this method I only need to trace one line for each patch. I mark the dots at the same time. (In the photo I used a dark marker so the lines would show for purposes of illustration. I usually mark much more lightly.

See the masking tape tabs? They are little handles I can grab to quickly reposition the templates. The bent ends of the window template serve the same purpose.
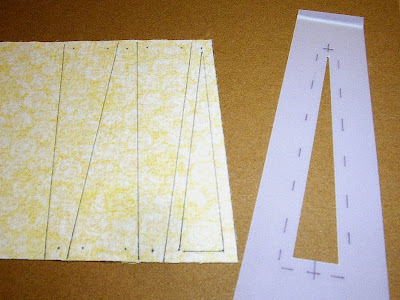
Below you can see the window template in action. I align it with the dots I have marked. For efficiency, I do every-other patch all along the strip, then I turn the template around and do the remainder. I need 32 of this particular patch, so these little efficiencies really speed up the process.

Above, the window template is aligned for tracing. Below, the line has been traced and the template removed.

You might think this is a lot of work, but once the templates are made, the tracing is very quick. I don't cut these patches apart with a rotary cutter but sit in my comfortable chair with a little pair of scissors and cut along the lines.
Templates and File Conversion


If you can imagine each of the above images as normal page size, these are the template pages I printed out from EQ for the compass. The long skinny ones are all the same angle, so they only differ in length. The longest one has a shaped end to fit into the central pieced star. These will all be yellow. The shorter triangles are the "endcaps" to these long points. They will be white. The two little diamond shapes are for the central star; one will be yellow and the other white.
In order to post these images, I had to save my EQ layout to PDF, then convert the file for each page to PNG, then convert those to JPG. This was quite an adventure. It kept me happily occupied for a couple of hours this morning.
You can print those pages, if you want to make your own set of templates. I tried it, and though it didn't come out exactly the same size as my original pages, it was proportional, so the templates will all fit together properly.
Subscribe to:
Posts (Atom)


